
Note: To ensure a Smooth Assessment and to avoid last-minute issues, please make sure that all prerequisites are met before starting your assessment. You can start by checking your system readiness using the Prerequisites check. This will ensure your system meets all the requirements.
The precheck process ensures your system, environment, and identification meet the requirements for the online examination. The steps displayed during the pre-check/pre-flight process may vary depending on the configuration set by your test administrator. If you do not encounter a particular step in the pre-check, you can proceed with the exam without concern.
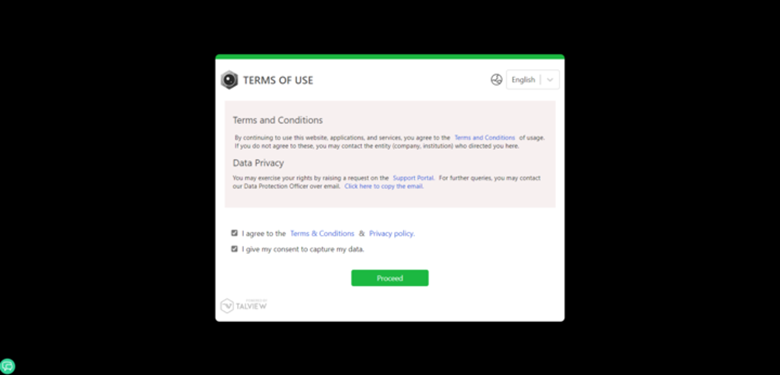
1. Terms of Use

Steps
Review the Terms & Conditions displayed at the bottom of the screen.
Check the box to confirm agreement.
If greyed out, scroll through the entire document; some systems require full scrolling before enabling the checkbox.
Click Next to proceed.
Troubleshooting
Problem | Solution |
Checkbox greyed out | Scroll through the entire document. |
Next button unresponsive | Refresh the page or check your internet connection. |
2. Instructions
Steps
Ensure a quiet, distraction-free environment.
Close unnecessary applications (Skype, Hangouts, etc.).
Keep your microphone close to your mouth and stable.
Click Next to continue.
Troubleshooting
Problem | Solution |
Next button not working | Refresh the page or switch to a supported browser (Chrome, Edge, Firefox). |
Audio/video instructions not visible | Check camera/mic permissions and restart browser. |
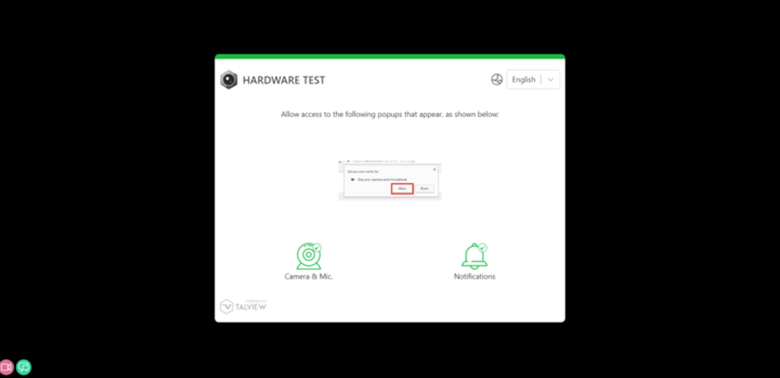
3. Hardware Test – Camera & Microphone
Steps
When prompted, allow camera and microphone access in the browser pop-up.
Enable notifications if requested.
Click Next once access is granted.
Troubleshooting
Problem | Solution |
Camera/mic not detected | Verify system-level permissions:Windows: Settings → Privacy → Camera/Mic.macOS: System Settings → Privacy & Security → Camera/Mic. |
Other apps using camera/mic | Close all other apps using camera/mic. |
Notifications blocked | Enable manually in browser: Settings → Privacy → Notifications. |
Note: Please refer to this below troubleshooting guide:
Configuring Mac OS Web Browser Permissions : Support Center
Configuring Browser Permissions on Windows : Support Center
4. Screen Sharing Setup

Steps
A pop-up will request screen sharing. Click Allow/Share.
Select Your Entire Screen and confirm.
Verify successful sharing.
Troubleshooting
Problem | Solution |
Screen sharing dialog missing | Refresh the page and try again. |
Permission denied for mac OS |
|
Please refer to this troubleshooting guide:
1. Guide to Share your screen
2. Configuring Mac OS Web Browser Permissions : Support Center
5. Secondary Camera Setup

Steps
After initiating screen sharing, set up a secondary camera using your mobile device.
Scan the QR code displayed on the screen.
Ensure your phone is fully charged and auto-lock is disabled.
Follow on-screen instructions to complete setup.
Click Proceed to start Photo ID verification.
Troubleshooting
Problem | Solution |
QR code not scanning | Ensure proper lighting and camera focus. |
Mobile camera not detected | Disable auto-lock, restart phone, and retry. |
Secondary camera setup fails | Close other camera apps; refresh browser. |
Camera permission not granted in mobile browser | Adjust permissions: |
iPhone:
Settings → Privacy & Security → Camera.
Find browser (e.g., Chrome) → toggle ON.
Android:
Settings → Privacy → Permission Manager → Camera.
Find browser → Allow only while using app or Always allow.
Note: Restart browser and scan QR code again after permissions are set.
Please refer to this troubleshooting guide: Secondary Camera Set-Up and Usage Guidelines : Support Center
6. Photo ID Verification

Steps
Hold your photo ID to the camera; ensure all text is legible.
Click Capture. Alternatively, upload a scanned copy (.png, .jpg, .jpeg, <5MB).
Confirm uploaded/captured ID is clear.
Troubleshooting
Problem
Solution
Capture button not working
Refresh page or switch browser.
ID not detected
Adjust lighting and hold ID steady.
File upload fails
Check format (<5MB).
Please refer to this troubleshooting guide: Uploading an ID Card Without Issues
7. Face Capture

Steps
Check language settings; select English if needed.
Position your face fully in the camera preview.
Ensure good lighting; select correct camera if multiple are available.
Click Next, then Take a Picture.
Troubleshooting
Problem
Solution
Face not detected
Adjust lighting, remove background clutter, ensure lens clean.
Camera not showing
Verify permissions and select correct camera.
Hold your photo ID to the camera; ensure all text is legible.
Click Capture. Alternatively, upload a scanned copy (.png, .jpg, .jpeg, <5MB).
Confirm uploaded/captured ID is clear.
Problem
Solution
Capture button not working
Refresh page or switch browser.
ID not detected
Adjust lighting and hold ID steady.
File upload fails
Check format (<5MB).
Please refer to this troubleshooting guide: Uploading an ID Card Without Issues
7. Face Capture
Steps
Check language settings; select English if needed.
Position your face fully in the camera preview.
Ensure good lighting; select correct camera if multiple are available.
Click Next, then Take a Picture.
Problem
Solution
Face not detected
Adjust lighting, remove background clutter, ensure lens clean.
Camera not showing
Verify permissions and select correct camera.
Please refer to this troubleshooting guide:
8. Hardware Test – Audio
 Steps
Steps
Select correct microphone from the dropdown.
Speak clearly following on-screen instructions.
Confirm functionality and click Next.
Troubleshooting
Problem
Solution
Microphone not detected
Verify system permissions (Windows/macOS)
Audio unclear
Use headset; position mic close and unmuted.
Please refer to this troubleshooting guide: Troubleshooting 'Not Enough Speech Detected' Issue
9. Environment Test
Steps
Show table, floor, and ceiling using webcam.
Perform a 360° room scan.
Confirm submission by clicking Submit.
Troubleshooting
Problem
Solution
Camera unable to capture room
Adjust lighting, reposition webcam.
Room scan fails
Close apps, remove clutter, ensure good lighting.
Please refer to this troubleshooting guide: Troubleshooting Guide for Environment Test failures
Conclusion
The precheck process ensures you are prepared for the online exam. Carefully follow each step to avoid disruptions. If issues persist, consult the troubleshooting links embedded in each step or contact the exam support team.
StepsSelect correct microphone from the dropdown.
Speak clearly following on-screen instructions.
Confirm functionality and click Next.
Problem
Solution
Microphone not detected
Verify system permissions (Windows/macOS)
Audio unclear
Use headset; position mic close and unmuted.
9. Environment Test
Steps
Show table, floor, and ceiling using webcam.
Perform a 360° room scan.
Confirm submission by clicking Submit.
Troubleshooting
Problem | Solution |
Camera unable to capture room | Adjust lighting, reposition webcam. |
Room scan fails | Close apps, remove clutter, ensure good lighting. |
Please refer to this troubleshooting guide: Troubleshooting Guide for Environment Test failures
Conclusion
The precheck process ensures you are prepared for the online exam. Carefully follow each step to avoid disruptions. If issues persist, consult the troubleshooting links embedded in each step or contact the exam support team.
If you continue facing issue and would like to raise a support ticket, click here
Tags: